Hello, hello.
This is a heads up or warning post. I plan to participate in Blogging 101, a blogging prompt course hosted by The Daily Prompt. I know I've been doing this for about 2 years now and I have my personal blog which has been up for 4 or 5 years, but I want to see how I can improve and if I can keep up with daily posts. All posts will be tagged with #blogging101. And yes, these posts will be in addition to the regular business posts I write. Wish me luck!

Showing posts with label scarletmcreates. Show all posts
Showing posts with label scarletmcreates. Show all posts
Monday, February 2, 2015
Making Products for Muscle Aches
On Twitter the other day, I mentioned how I was getting requests for new products. Well, my gym instructor asked about something to offer his more advanced students for aching muscles. Since I had aching muscles I thought I'd give a try at mixing up something with rosemary and chamomile. Rosemary being known to soothe aching muscles and chamomile just being comforting in general.
 So when I got home I mixed a bath soak up quick and dirty, took a pic and posted it, then jumped in a bath. I noticed the affects immediately. I had had my doubts since this was a topical application but I had seen people recommend using compresses so I thought why not. But it worked. 20 minutes in the bath reduced the ache in my muscles enough to sleep comfortably that night. However, it was back the next morning.
My next experiment I tried a week later on the premise that maybe massaging in the oils would help. Massaging in general helps my achy muscles. But, I that weekend I had planned to once again take up the challenge of getting my body butter recipe to whip. So instead of a massage oil, I made a body butter with rosemary and chamomile oils. It came out great. I finally figured out how to get the butter to whip and how many drops of essential oils to use to overpower the scent of the butters. When I tried it after my next workout it was wonderful. The butter melts when on the skin, so it massages in easily. Plus the combination made me sleep like a baby with only a slight twinge the next day to let me know there was ever any ache.
 So I've got those products ready. I still plan to make the massage oil which is simple. All I have to do now is create a description for each that explains the use, draws customers and yet doesn't make any drug claims so that I do not attract the attention of the FDA. Yeah, you read that right; the Food and Drug Administration. I'll talk about the webinar I attended about aromatherapy labeling and its revelations in my next post. In the meantime look for my new products to be in the Etsy shop soon.
So when I got home I mixed a bath soak up quick and dirty, took a pic and posted it, then jumped in a bath. I noticed the affects immediately. I had had my doubts since this was a topical application but I had seen people recommend using compresses so I thought why not. But it worked. 20 minutes in the bath reduced the ache in my muscles enough to sleep comfortably that night. However, it was back the next morning.My next experiment I tried a week later on the premise that maybe massaging in the oils would help. Massaging in general helps my achy muscles. But, I that weekend I had planned to once again take up the challenge of getting my body butter recipe to whip. So instead of a massage oil, I made a body butter with rosemary and chamomile oils. It came out great. I finally figured out how to get the butter to whip and how many drops of essential oils to use to overpower the scent of the butters. When I tried it after my next workout it was wonderful. The butter melts when on the skin, so it massages in easily. Plus the combination made me sleep like a baby with only a slight twinge the next day to let me know there was ever any ache.
So I've got those products ready. I still plan to make the massage oil which is simple. All I have to do now is create a description for each that explains the use, draws customers and yet doesn't make any drug claims so that I do not attract the attention of the FDA. Yeah, you read that right; the Food and Drug Administration. I'll talk about the webinar I attended about aromatherapy labeling and its revelations in my next post. In the meantime look for my new products to be in the Etsy shop soon.
Monday, October 20, 2014
Holiday Boot Camp
Hey guys,
Its been crazy in the crafting world and in the every day world too. This year I joined Etsy's Holiday Boot Camp and boy is it not what I thought. I thought I'd be getting emails once a week with goals or suggestions for how to prepare for the holiday shopping season. I get emails twice a week though and they are done already. Only eight emails though they came with great worksheets. I thought they would be paced out so you'd get a reminder as you gear up for and go through the holiday season. Kinda of like an e-personal trainer or drill sergeant. Guess I'll have to come up with my own way of doing that.
The first email was to set a goal for the season. My goal is too make $350 in profit by the end of the year. I picked this because I have only made two sales in as many years and I'd like to prove to myself that this can be profitable. I want to move towards the goal of having at least some money in my pocket when I finish my job in March next year. I also want to push myself to update and spruce up my shop and business practices.
There are things that I haven't done like finalize my logo and labels, update my product pictures and promote regularly on all social networks, that I should have done by now. My production and promotion processes should be streamlined by now but they are not. I needed the reason and the encouragement that this Holiday Boot Camp can give to focus more in this business and make it a success.
So, it has been 4 weeks now, I think, and a lot of what Etsy has suggested is on my list of things to do. After I thought out my goal, I wrote out (or typed up) a long list of things to do to get ready. Then I separated them into different categories like new listing, product pictures, social promotion and shipping. From there certain actions listed needed to be broken down into even smaller actions, so I did that as well. Now, I need to come up with a timeline and continue to go down that list. One of the things on that list is posting blogs more often about new products and about the Bronx Etsy Team members as well as other crafters and craft ideas I like and enjoy. Look out for those posts. I also plan to post a recap of this Holiday season; how it went and whether or not I reached me goal. See you on the other side.
Monday, August 25, 2014
Handmade Book Product Lines
Continuing with the book series of posts, this week I will talk about creating a line of products. I've got two areas in which to create: type and design; form and function if you will.
For now the form consists of 8 unique covers designs where I will have a few ready made while being able to take custom orders. The books already made will all have the same basic design format but I'll have an array of colors and paper designs. I've come up with names for as few already. Think of the ripped cover design I had on the book I posted about last week? That line I would call Ripped, for example (but no, really), and instead of blue and purple, I'll use red and orange book cloth and papers for the cover and end pages.
The function on the other hand will be what's inside the covers. Blank lined paper, sleeves for photos, drawing paper, specialty page designs, etc. The pages will impact what the book is used for; whether it be as a journal, BoS, photo album, scrapbook, sketchbook, or anything else. Down the road I'll add my own pre-designed pages to some of them but for now this is what I am trying to finalize before I offer the books in my store.
In the meantime you will be teased and tantalized.
Wednesday, August 20, 2014
My Post-Bound Book Making Process
I said I would do this in my last post. So here it is with pictures. This set of pictures is when I made a personalized Book of Shadows or journal.
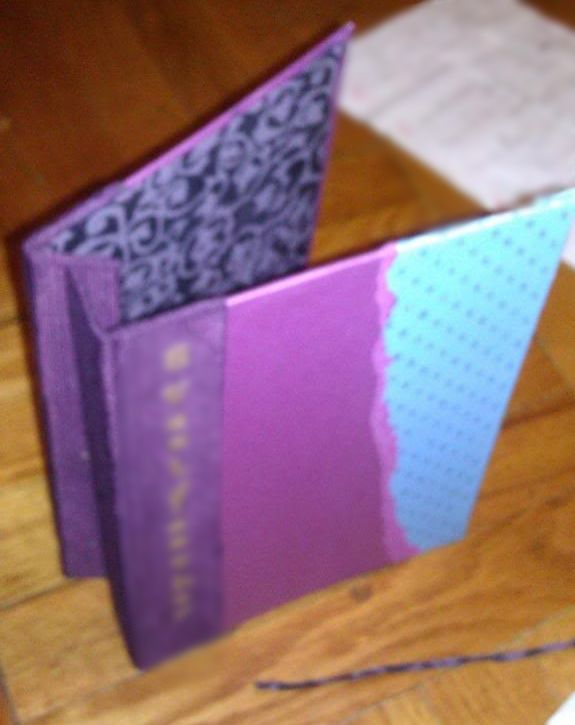
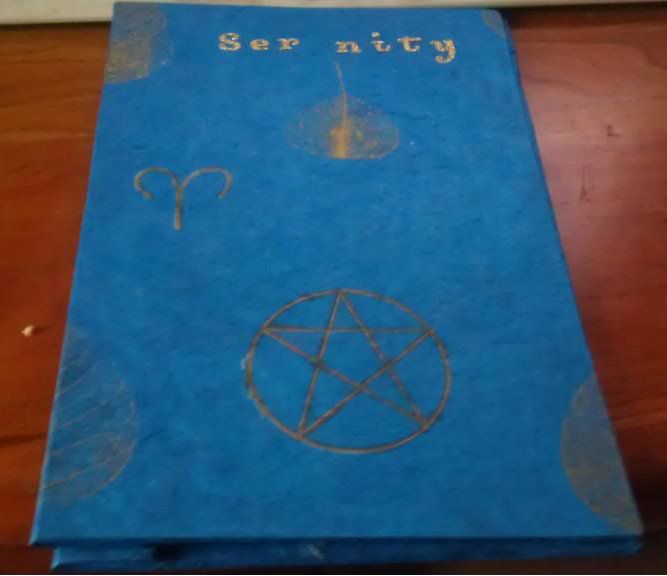
Before we begin, here is the finished product. I also want you all to know that this is only the 2nd book I ever made. The first one I made for myself and its much bigger but I did not take any pictures at the time. This book I decided to make since the first one came out decent enough and I wanted to make a gift for a friend. I had lots of supplies left over and I had been collecting specialty book papers for the net bookmaking occasion.
When I took these pictures it was mostly for me to be able to look back on what I've done. So they are far from perfect; I used my the camera on my cell phone and this was back before megapixels was a big deal and my flash wasn't so great (believe it or not the overhead lights were on throughout this picture taking process). I chose to use this book and these pictures to showcase my process as more of a walk down memory lane rather than a sleek, fashionable post trying to get you to buy something (that'll come later ;) ).
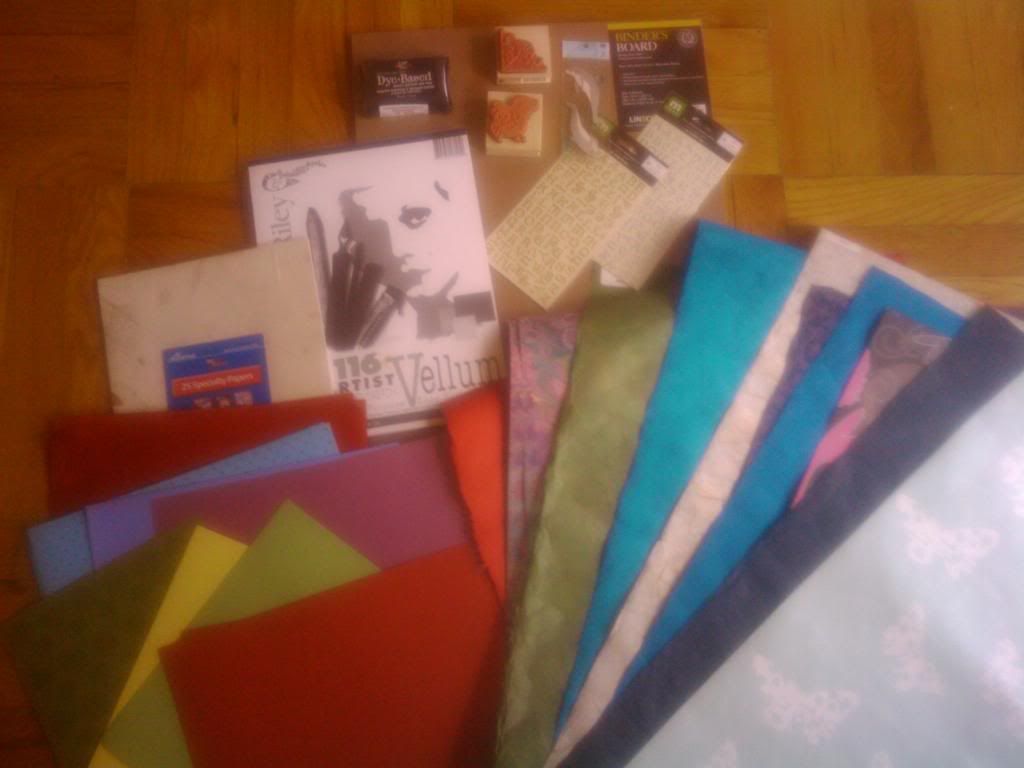
First, I must start off with supplies which in this case, consists of book board, vellum paper, stamps, stick-on letters, book cloth and end papers. Other supplies not shown include, hole punch, screw punch, rulers, crafters glue, a cutting mat, x-acto knives, paintbrushes, and scissors. All used in the average bookmaking process.
The glossy lilac ripped to interestingly, I left it on. I loved the matte finish that showed at the edges of the tear and it seemed to me that it gave this feeling of revelation. Like, ooh look what's under here. Like I said, the ripped layer stayed. Next came the last layer, which I wanted just for that library book look; the darker toned spine. Now, one thing to remember is that the books I make are post bound. This one in particular has no spine. But in order for the book covers to be able to open properly, they have to cut out separately from the section of book board that the posts will screw into and then connected with book cloth, book paper, etc.
As I leave the partially complete cover to dry under the many, many books that I own (much cheaper than a press), I went back to the book board and cut out the ends for the covers. They will be the same length as the covers but only about 1" wide. Once I have those cut out I must now drill holes in them with my screw punch. I chose to use 3 holes on this particular book. Then I brought back the now dried cover with the two other layers already on it. I measure and cut out the amount of book cloth I will need and lay it face down to brush glue over the back. Leaving a centimeter or two of space between the front cover and its corresponding spine, I place them on the glue and fold the end of the cloth over to connect the two pieces; making sure to leave the space in between so the book cover can be opened.


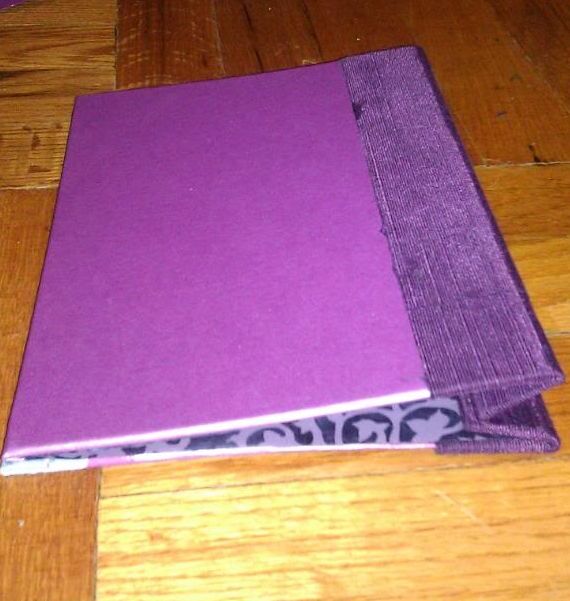
Before we begin, here is the finished product. I also want you all to know that this is only the 2nd book I ever made. The first one I made for myself and its much bigger but I did not take any pictures at the time. This book I decided to make since the first one came out decent enough and I wanted to make a gift for a friend. I had lots of supplies left over and I had been collecting specialty book papers for the net bookmaking occasion.
When I took these pictures it was mostly for me to be able to look back on what I've done. So they are far from perfect; I used my the camera on my cell phone and this was back before megapixels was a big deal and my flash wasn't so great (believe it or not the overhead lights were on throughout this picture taking process). I chose to use this book and these pictures to showcase my process as more of a walk down memory lane rather than a sleek, fashionable post trying to get you to buy something (that'll come later ;) ).
First, I must start off with supplies which in this case, consists of book board, vellum paper, stamps, stick-on letters, book cloth and end papers. Other supplies not shown include, hole punch, screw punch, rulers, crafters glue, a cutting mat, x-acto knives, paintbrushes, and scissors. All used in the average bookmaking process.
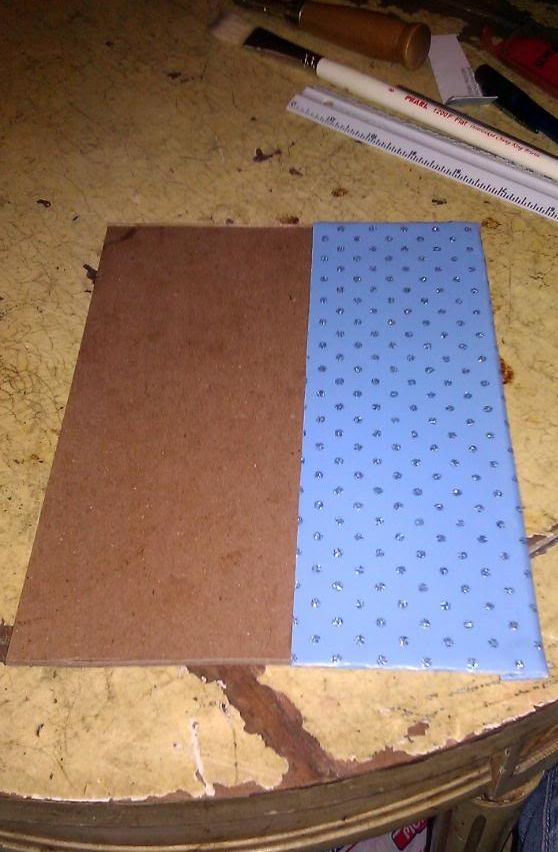
Now, the first step is to cut down the book board to the cover size you want. I made this book roughly 6"x9" and the book board I had gotten was 12"x12". Book board, just so you know, is hard, pressed cardboard-like material. Just think of any hardcover book or textbook cover. Its comes in multiple thicknesses but it hard to damage and protects the precious pages within its borders. Again, at the time all I had to properly cut the book board were my x-acto knives. It was slow going. but it got there.
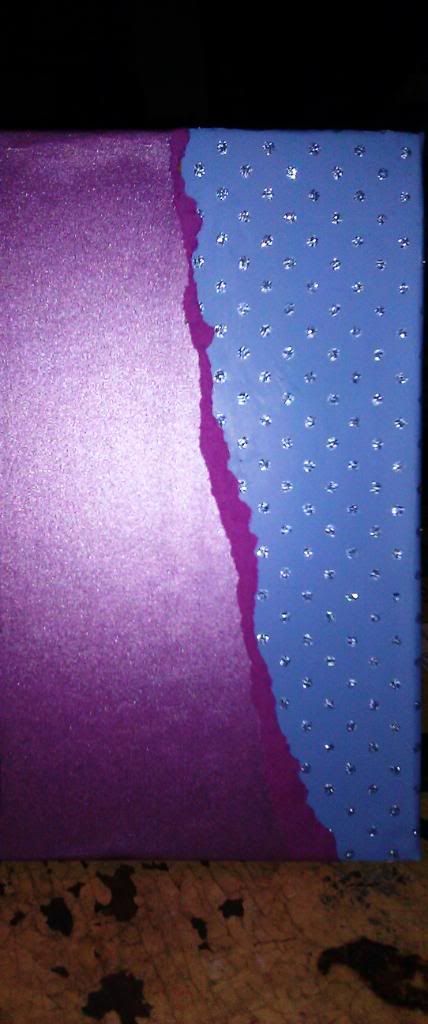
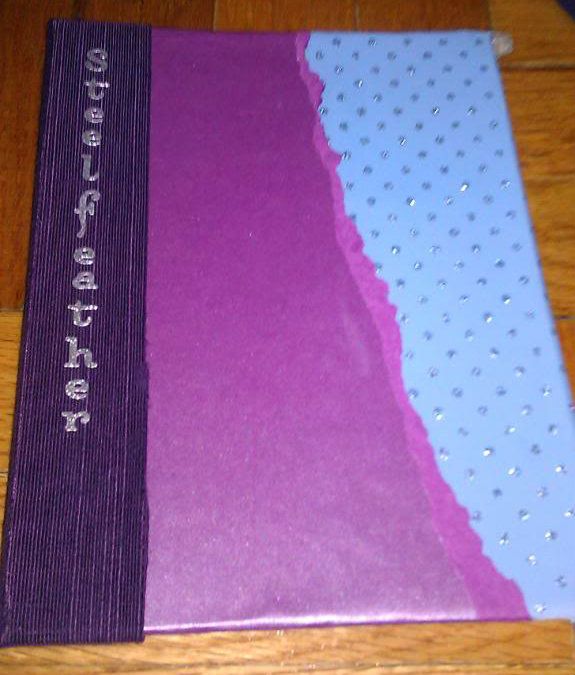
From there you want to do some more cutting, this time of various papers. It helps to have a plan in mind for what you want to book cover to look like. I did not really at this time. I knew the colors I wanted to use and the papers but how was I going to make it all work I did not know. So I cut down the interior paper to size, then I contemplated the cover papers I wanted to use. I had three; this lovely sky blue with polka dots, a glossy lilac and this dark purple Japanese book cloth and I decided to layer them across the cover.
First, I cut down and glued on the baby blue paper as shown above. Since I was going to layer the other parts over it there was no need to use paper enough to cover the entire front cover. Now here comes the interesting part. I planned a completely boring, in my opinion now, straight, vertical layer of the of the glassy lilac paper over the blue and in an effort to keep as much glue off of the sections you will see I did not brush glue over the entire back of the lilac paper. When I went to glue down the rest of it, I accidentally ripped the paper. Thinking that I would have to start the whole thing oer from scratch, I just finished the rip and pull of the excess. That resulted in this.
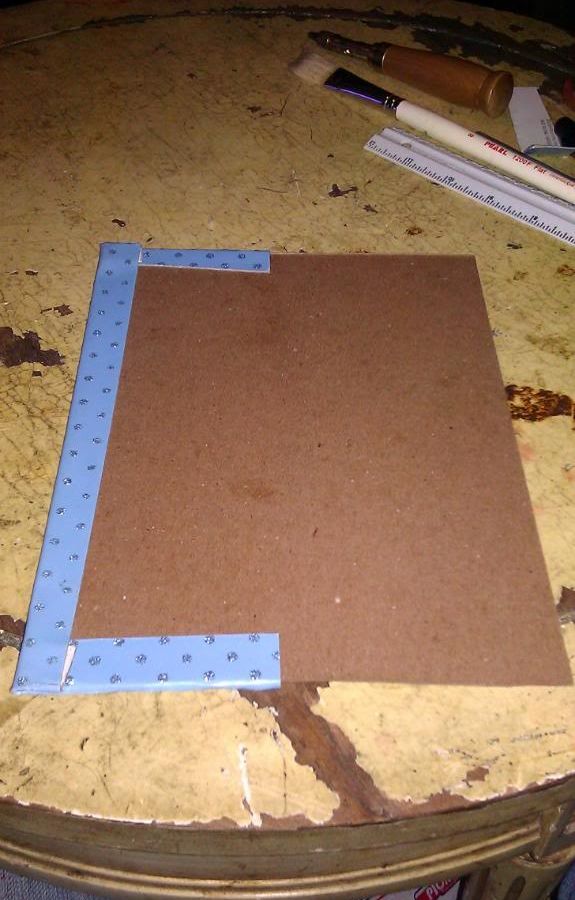
As I leave the partially complete cover to dry under the many, many books that I own (much cheaper than a press), I went back to the book board and cut out the ends for the covers. They will be the same length as the covers but only about 1" wide. Once I have those cut out I must now drill holes in them with my screw punch. I chose to use 3 holes on this particular book. Then I brought back the now dried cover with the two other layers already on it. I measure and cut out the amount of book cloth I will need and lay it face down to brush glue over the back. Leaving a centimeter or two of space between the front cover and its corresponding spine, I place them on the glue and fold the end of the cloth over to connect the two pieces; making sure to leave the space in between so the book cover can be opened.
As you can see above there on the left hand side, there is a small indentation where there is nothing but book cloth. Here is where the book cover will bend when you open it. Now the back cover, I decided to keep simple by using just two layers; the glossy lilac and the purple book board to connect the back cover with its spine. You can see that below this time the crease is on the right-hand side.
You might think the covers are done but they are not. When was the last time you opened any book and saw the book board on the inside cover? I think its safe to say never for most of you. More often then not when it comes to hard cover books you'll see some type of fancy paper called end paper. End papers are usually a different type of paper than used anywhere else in the book and are folded in half with one end glued to the inside of the covers and the other end serves as the first page of the book. For the purposes of this book the end papers only line the inside of the covers.
As you can see above, I used a very thin, almost tissue like paper with a subtle floral print in matching colors for the end papers. And just so you know, I have since learned that its more visually appealing to leave a bit of the cover papers showing around the edges of the end paper inside. I pasted these inside each cover with very little glue, careful to brush it on evenly since this paper was much more delicate than any of the others. Too much glue and it would bleed through the paper or worse rip it.
After setting these aside once again between tons of books to dry flat, I got ready the hole puncher to punch through the book cloth and make the holes I screwed into the book board visible again. I also, took the vellum which I intended for use inside and punched holes in the same areas as those on the covers and I also creased the pages so that they would bend easily when turned. For these jobs I use a simple paper cutter with various settings.
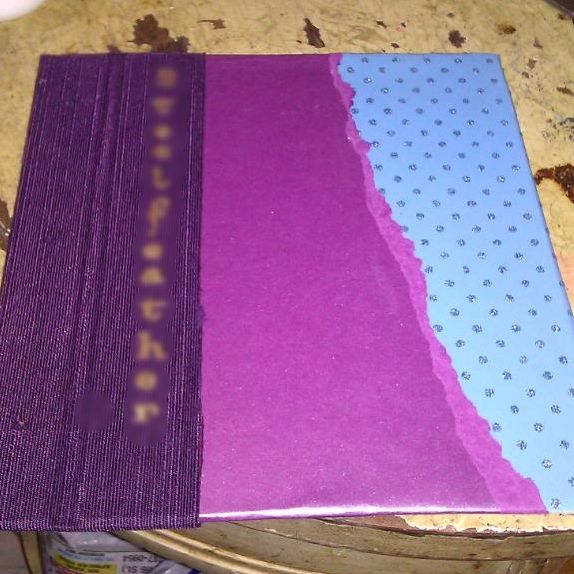
Once the covers are dry, I take them out and line them up for personalizing. There was only a bit more added to it including, on this particular book, adding the name to the front spine with simple stick on letters. They've been blurred out a bit in a previous picture above. Then I line up the pages and the covers by their holes and screw them all together with the screw posts.
Et Voila!
Tuesday, June 10, 2014
Bookmaking
For as long as I can remember I have always loved books. All kinds of books, not just reading books. Everything from Encyclopedias to planners is fascinating to me. And of course I absolutely love reading books; it's my favorite pastime; my addiction.
Bookmaking however has only been a relatively recent fascination. I got interested in bookmaking in a sort of roundabout way. For those who do not know, my religion falls under the Pagan umbrella and back when I first started learning and studying, all the books and people practicing talked about having personal books to keep all my notes, thoughts and beliefs in. One online mentor gave me the intriguing idea of scrapbooking. Scrapbooking is something I always found interesting and had done a few times in the past so I thought why not. However after searching long and hard I could not find the type of book I wanted. Nothing spoke to me even in stores, plus it was hard to find a book that I knew was easy to add pages to later on.
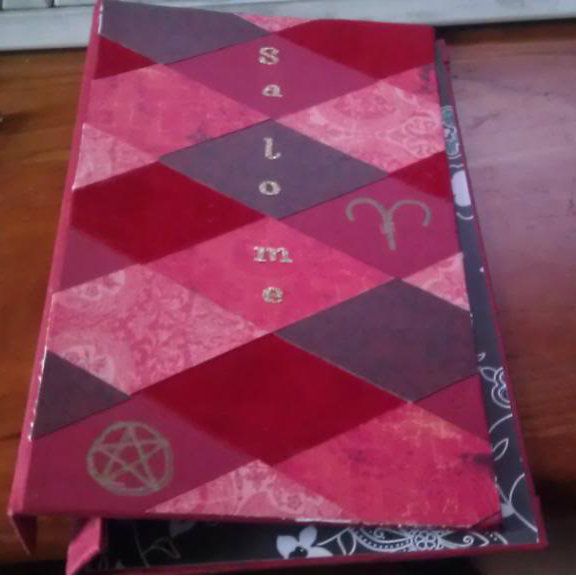
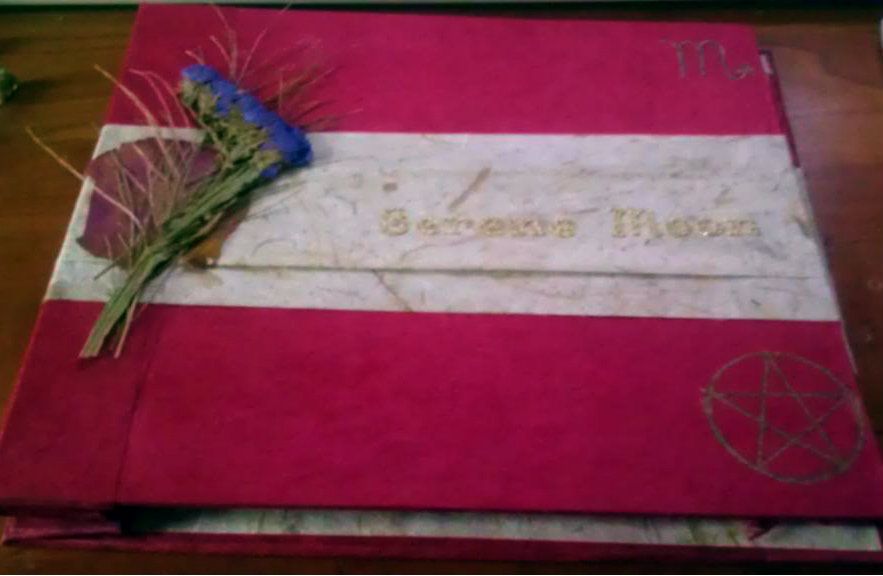
Then I came across a blog post online which explained with pictures how to make a post bound book. It took me awhile but I bought all the materials (fell in love with the specialty paper section at the local art supply and stationary stores) and built my first book. The scrapbooking continued from there every once in awhile but I thought I was done. Then a few years later a group of friends were graduating and I wanted to make something for them instead of buying it. It took me awhile but after I came up with the idea of making small, personalized books for them I kept going until I had all six done. They came out great if I do say so myself. Here are pictures of four of them.
 I have not made many books since then because it takes a lot of time and space and my personal life went through a lot of changes not too long after that. But I've learned other styles of bookbinding, like Japanese ribbon binding. And I've taken the last year to study how others are binding, designing, marketing, pricing and selling their hand-made books since I had planned to include books in my Etsy shop from
the beginning.
 The thing is, books take a lot longer to make than my bath and body products and its more labor intensive especially since I don't have any of the expensive equipment that makes it easier. But lately, I've been getting the urge to make new books to put up for sale. The idea machine in my head has stopped churning out new ideas for body scrubs and bath soaks. I still have quite a few to unveil in the shop but I think I'll be physically focused on bookmarking for the next few months. My post next week will probably be a picture heavy post showing you my bookmaking process. I hope you guys will look forward to that. I can't wait for you all to see another side of my creative process.
Bookmaking however has only been a relatively recent fascination. I got interested in bookmaking in a sort of roundabout way. For those who do not know, my religion falls under the Pagan umbrella and back when I first started learning and studying, all the books and people practicing talked about having personal books to keep all my notes, thoughts and beliefs in. One online mentor gave me the intriguing idea of scrapbooking. Scrapbooking is something I always found interesting and had done a few times in the past so I thought why not. However after searching long and hard I could not find the type of book I wanted. Nothing spoke to me even in stores, plus it was hard to find a book that I knew was easy to add pages to later on.
Then I came across a blog post online which explained with pictures how to make a post bound book. It took me awhile but I bought all the materials (fell in love with the specialty paper section at the local art supply and stationary stores) and built my first book. The scrapbooking continued from there every once in awhile but I thought I was done. Then a few years later a group of friends were graduating and I wanted to make something for them instead of buying it. It took me awhile but after I came up with the idea of making small, personalized books for them I kept going until I had all six done. They came out great if I do say so myself. Here are pictures of four of them.
the beginning.
The thing is, books take a lot longer to make than my bath and body products and its more labor intensive especially since I don't have any of the expensive equipment that makes it easier. But lately, I've been getting the urge to make new books to put up for sale. The idea machine in my head has stopped churning out new ideas for body scrubs and bath soaks. I still have quite a few to unveil in the shop but I think I'll be physically focused on bookmarking for the next few months. My post next week will probably be a picture heavy post showing you my bookmaking process. I hope you guys will look forward to that. I can't wait for you all to see another side of my creative process.
Wednesday, April 30, 2014
Facebook Marketing
I have come to the somewhat sad conclusion that Facebook is not the place for me to build an original following for Scarlet Moon Creations. Facebook before it went public would have been great for my young business. Unfortunately, I did not create a business page until just before that. The effect going public had was that now Facebook had to prove that it could make money as a social networking site. It decided to do this in one way by changing its site wide algorithms ruling what content users see. Basically, the more you like a certain person's or page's posts the more they show up on your news feed. The drawback to that is if you don't click that like button often enough those 'less liked' people and pages will disappear from your news feed.

Now all of us who have used Facebook for purely personal reasons know that we don't click that button for everything we see on our news feeds but that does not mean we do not want to see it all. Now Facebook did try to adjust things by giving you the option to change your settings and let certain people and pages onto your news feed while blocking others. They then came up with the Pages Feed so that you could actually see what the businesses and groups are up to without them getting lost among your more personal contacts. You can even make lists for family, friends, co-workers, and any other specialized grouping so that they can essentially have a separate news feed that you can look at. But honestly, when it comes down to it who wants to do all that work to find out what's going on with the people, places and things you have already taken the time to find and like so you could follow them easier. It somewhat defeats the purpose.
After officially going public, Facebook took even more measures to show its backers it can make money by creating advertising and boost payment packages for pages. "Hey, not getting enough followers, why don't you pay for an ad that you create for your target market here." Not a bad idea; a good one actually. But on top of that Facebook's new algorithm says, "hey all those followers you got (and possible paid for ads to get) aren't really seeing your posts. Really it's only 6% of them so you should pay to boost your individual posts so that the people who already liked your page can actually see you on their news feeds." Many business pages went from having, as an example, 1,000 followers and roughly 600 likes and/or views for each post they publish down to roughly 60 likes and/or views per post. For those of us just starting out, you only get about 5-10 views or likes per post unless you pay to boost your posts. And that's hard on a new small business. Unfortunately, within the past few weeks Facebook has done another update that reduces views for posts to only 1-2% of your following.
One way to get around the views issue is for your followers to click yes for notifications from your page once they like your page. This means every time you post something they will get a notification. The drawbacks are if those people don't look at their notifications often, it makes no difference or if you post a lot all those notifications can become annoying.
So with all of this, these past few months I've been very frustrated trying to crunch the numbers and coming to the conclusion that Facebook is not the place to build a new business following. I think it's best to be more established elsewhere first and then give those people the option to follow me on Facebook and to offer Facebook only specials.
What does this mean for Scarlet Moon Creations and Facebook? Well, I've reduced my presence there by not posting as much. I plan to be more active on this blog and on my personal blog on tumblr. I use Pinterest, Instagram and most recently Google+ as sort of behind-the-scenes looks into Scarlet Moon Creations inspirations, creation process, ingredients, and its owner. I hope to create a full picture from all angles so you can see the business grow without being redundant across multiple social networking sites.

So Facebook is not going away entirely just having a reduced presence. I know that means more work for me since one of the perks of Facebook was if I go on for personal reasons and see or think of something worth posting on Scarlet Moon Creations page I could do so easily. That and already having a follower base to work from. But if even my friends and family cannot see my business posts to like and share it short of defeats the purpose. I wanted to end this post on a positive note and not a bitter one. I've gone back and forth over this entire issue and how I feel about it and I think that this decision is best for now and that is why I feel I can write about it. Its not the end, its just the beginning.
Now all of us who have used Facebook for purely personal reasons know that we don't click that button for everything we see on our news feeds but that does not mean we do not want to see it all. Now Facebook did try to adjust things by giving you the option to change your settings and let certain people and pages onto your news feed while blocking others. They then came up with the Pages Feed so that you could actually see what the businesses and groups are up to without them getting lost among your more personal contacts. You can even make lists for family, friends, co-workers, and any other specialized grouping so that they can essentially have a separate news feed that you can look at. But honestly, when it comes down to it who wants to do all that work to find out what's going on with the people, places and things you have already taken the time to find and like so you could follow them easier. It somewhat defeats the purpose.
After officially going public, Facebook took even more measures to show its backers it can make money by creating advertising and boost payment packages for pages. "Hey, not getting enough followers, why don't you pay for an ad that you create for your target market here." Not a bad idea; a good one actually. But on top of that Facebook's new algorithm says, "hey all those followers you got (and possible paid for ads to get) aren't really seeing your posts. Really it's only 6% of them so you should pay to boost your individual posts so that the people who already liked your page can actually see you on their news feeds." Many business pages went from having, as an example, 1,000 followers and roughly 600 likes and/or views for each post they publish down to roughly 60 likes and/or views per post. For those of us just starting out, you only get about 5-10 views or likes per post unless you pay to boost your posts. And that's hard on a new small business. Unfortunately, within the past few weeks Facebook has done another update that reduces views for posts to only 1-2% of your following.
 |
| Courtesy of Pixabay |
What does this mean for Scarlet Moon Creations and Facebook? Well, I've reduced my presence there by not posting as much. I plan to be more active on this blog and on my personal blog on tumblr. I use Pinterest, Instagram and most recently Google+ as sort of behind-the-scenes looks into Scarlet Moon Creations inspirations, creation process, ingredients, and its owner. I hope to create a full picture from all angles so you can see the business grow without being redundant across multiple social networking sites.
So Facebook is not going away entirely just having a reduced presence. I know that means more work for me since one of the perks of Facebook was if I go on for personal reasons and see or think of something worth posting on Scarlet Moon Creations page I could do so easily. That and already having a follower base to work from. But if even my friends and family cannot see my business posts to like and share it short of defeats the purpose. I wanted to end this post on a positive note and not a bitter one. I've gone back and forth over this entire issue and how I feel about it and I think that this decision is best for now and that is why I feel I can write about it. Its not the end, its just the beginning.
Monday, December 16, 2013
New Etsy Shop Feature
After looking in on one of my personal favorite Etsy shops, I noticed something I had not seen before. They have a drop down menu so customers can choose among the different sized guest books they were offering. That in and if itself is not new to me. What caught my eyes was the fact that they had different prices listed next to each size and that when you make your choice, the total price you pay for the book changes. Somehow, I missed when this went into affect on Etsy.


When I first opened my shop I knew I would have different sizes for most of the items I would sell, but after checking around I found that while you can have different options (e.g. size, color) under one listing they all to be the same price. Now, that is obviously different. I am annoyed with myself for missing this but definitely happy and ready to take full advantage of this in my own shop.
For those of you who don't know, making just one Etsy listing, even a draft, takes at least 30 minutes. More if you include the time it takes you to get the right pictures, writing out a description and figuring out pricing, which you would do ahead of time, hopefully. Creating three listings, while not three times as long, is still longer. Plus, it seems obvious that customers would like it better if they didn't have to search for another listing of a different size and could just stay on the same page and choose the size they want with one click.
Just one more change I'd like to make to my shop. :-)
Monday, October 14, 2013
New Creation Space
 Isn't it lovely. I finally have a dedicated space to work on/at. A space with space. A space without a chair, but I'm working on it. Mind you this is taking up roughly 1/3 of my room and most of that was the only remaining free space I had. So alas, no dancing about. But this does mean I can finally, finally roll out the book board and specialty papers can come out of their portfolios. That's right, books can now be made!!
 It might seem like nothing but I have wanted to include handmade books for various purposes in my product selection since the beginning of this business. So much so that I considered making a separate Etsy shop just for them but I don't think I'm ready for that yet. This decision also affected my business name.
More on that in another post. My space is my old kitchen table and also a "portable" picnic table (it folds just weighs a ton). In my old kitchen there was no counter and no table so I got this to do both jobs. It of course also served as my main creation space. I plan to continue that tradition by using it to mix and match ingredients, fabric and papers for all my Scarlet Moon Creations. So look forward to future sightings of my creation space here on the blog.
hmm, I may have to make a special Pinterest board for such sightings. What do you think?
Friday, October 4, 2013
Pinterest - Scarletmcreates

This post is just to pimp my Pinterest boards. I've had it set up for Scarlet Moon Creations, the Etsy business, for awhile but I recently added more boards. I started it to get more inspiration and ideas for mixes, ingredients and packaging. I would have a new idea for a bath salt or body scrub but was not sure what herbs, flowers or essential oils I wanted to use. This in particular applies to the Sabbat mixes. I say in past tense since that is how I decided to create a Pinterest account, not because I don't still get stumped every once in awhile. Sometimes the ingredients come to me first and other times the overall product idea.
If you visit or follow my page you will see inspiration boards, but also the creation process and of course the finished product with links to my Etsy shop. So please do stop in and tell me what you think.
http://pinterest.com/scarletmcreates
Subscribe to:
Posts (Atom)